Before getting started, first review all integration options to make sure they meet your capabilities. All automated integration options offer the portal to manually process your documents. If you are using an automated option click the button link below to view the document specifications.
Continue to Processing Your Documents to learn how to process tests for each Integration Type.
| Integration Type | Description | Connection Options |
|---|---|---|
|
Portal |
Use the portal to receive your order information, send all documents related to them, and update inventory. Does not require any development. |
N/A |
|
EDI |
Receive EDI orders (850), send acknowledgements (855), Shipments (856), Invoices (810), Returns (180), and Inventory (846). Requires development from your team. |
SFTP/FTP AS2 VAN |
|
JSON |
Follow the Logicbroker standard JSON format to process Orders, Acknowledgements, Shipments, Invoices, and Returns. JSON is not available for Inventory. Requires development from your team. |
SFTP/FTP REST API |
|
XML |
Follow the Logicbroker standard XML format to process Orders, Acknowledgements, Shipments, Invoices, and Returns. If you want to process inventory using XML, it will require custom configuration from our implementation team; contact support for more information. Requires development from your team. |
SFTP/FTP REST API |
|
CSV/XLSX or Flat File |
Follow the Logicbroker standard CSV/XLSX format to process Orders, Acknowledgements, Shipments, Invoices, and Returns. If you want to use a Flat File document type, it will require a custom configuration from our implementation team, contact support for more information. Requires development from your team. |
SFTP/FTP REST API Portal |
|
System |
We offer a list of different pre-built connectors. Contact us to see what systems are available. |
N/A |
Note:
Logicbroker has the ability to support any custom format or system. Contact us for more information on getting the custom format integrated.
Creating Test Orders and Completing Test Cases
For all integration types, creating test orders and the available test cases will all be the same. You can click the link below to follow the walk-through to help you create test orders or follow the steps below.
Create Test Orders Walk-through
Navigate to Testing and select view for your trading partner you want to start the testing process with.

Here you will see a list of all available test cases with instructions and all required documents to submit for each test case. To start begin by clicking Create a New Test Order. This will begin by creating the test order and you can follow the instructions for in the description and step process.

When a new order is created you will see the link to the order in the first step; clicking it will take you to the order details page. All orders will be indicated with TEST # in the PartnerPO field. They will also be noted on the order detail page, providing links back to the test page.
Tip:
All test orders created will use products that were created during the product setup process. This includes the SupplierSKU, PartnerSKU, UPC, and ManufacturerSKU.
If you are using an integrated option, the order will be sent or made available to be picked up by your processing system. In addition, all steps thereafter requiring you to create documents related to the order can be completed using any of the integrated options as well.
Tip:
You can re-create new orders at any time, this will restart the test case and mark the original order as Ignored.
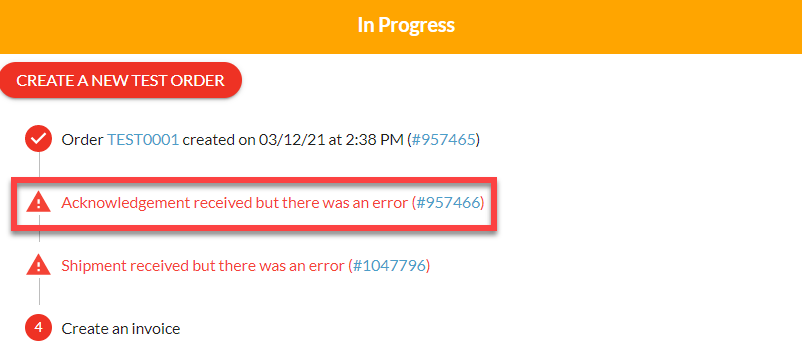
As you go through sending the required tests back for Acknowledgements, Shipments, Invoices or Returns, our system will provide results for each document. You can see the success or failure on the testing details page and can click into the linked document for the error details.
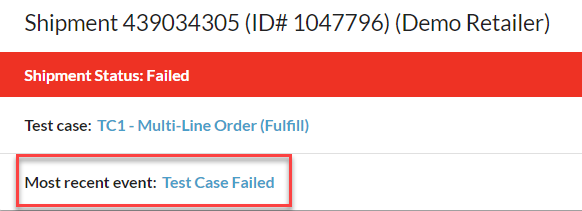
Clicking on the document will take you to the details page where you can review your results. Click the link to the Most recent event: Test Case Failed to see the details.
Processing Your Documents
Click on one of the tabs below to review the process for your integrated options.
Packing Slips
If you will be printing packing slips in the portal you can do so on the order details page or print the packing slips in bulk on the Order Management page. You can select a list of orders from your filtered Order Management and click Export.


You can also print packing slips off of the shipment. After selecting your shipment you will see a Download Packing Slip button at the top of the page.
Tip:
Not all channels/retailers will require packing slips. It is always best to check with your channel/retailer whether it is necessary to print and ship items with a packing slip.
Acknowledgements
You can begin by navigating to one of your test orders. At the top of the order you will see a button labeled Accept/Reject. Clicking it will create a draft of an acknowledgement for that order.
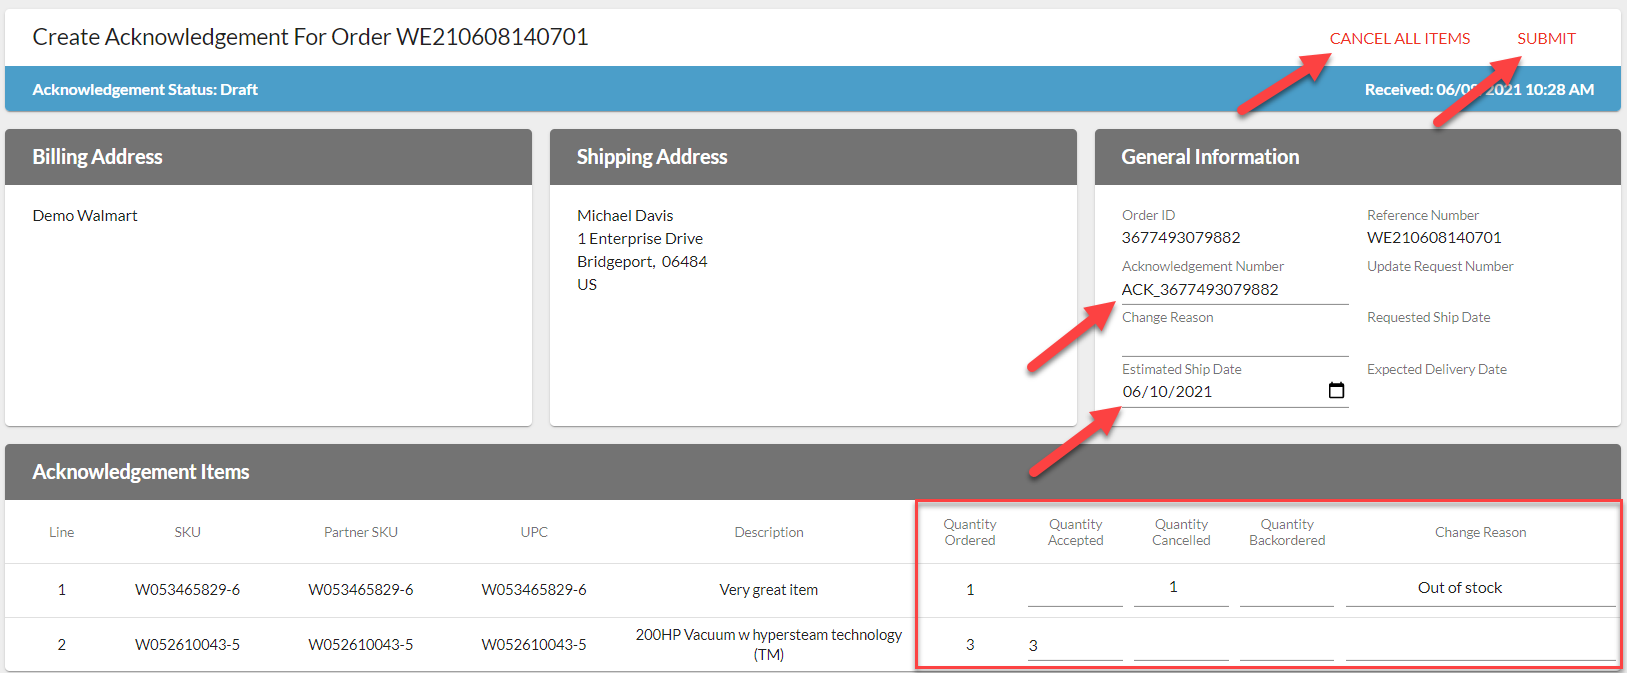 On the page you will see the list of your items. Add the quantities for which you want to accept, cancel or backorder. If you are cancelling, you should provide a reason. This will typically be a required code provided by your partner.
Once your items are selected, click Submit at the top. After submission, the document will processed and provide you the results for that step in the test case. For successful test cases the status will move to Complete and for errors it will move to Failed.
Tip:
You can also submit acknowledgements using CSV/XLSX through the portal. Click the CSV/XLSX tab and navigate to the portal connection option.
For more information on using acknowledgments through the portal see this article.
Shipments
Creating shipments follows the same process as the Acknowledgement. First navigate to your test order and select Ship at the top of the page. All available item information will automatically populate on the shipment page. Continue to add items to boxes and add a Tracking Number and Carrier for each box.
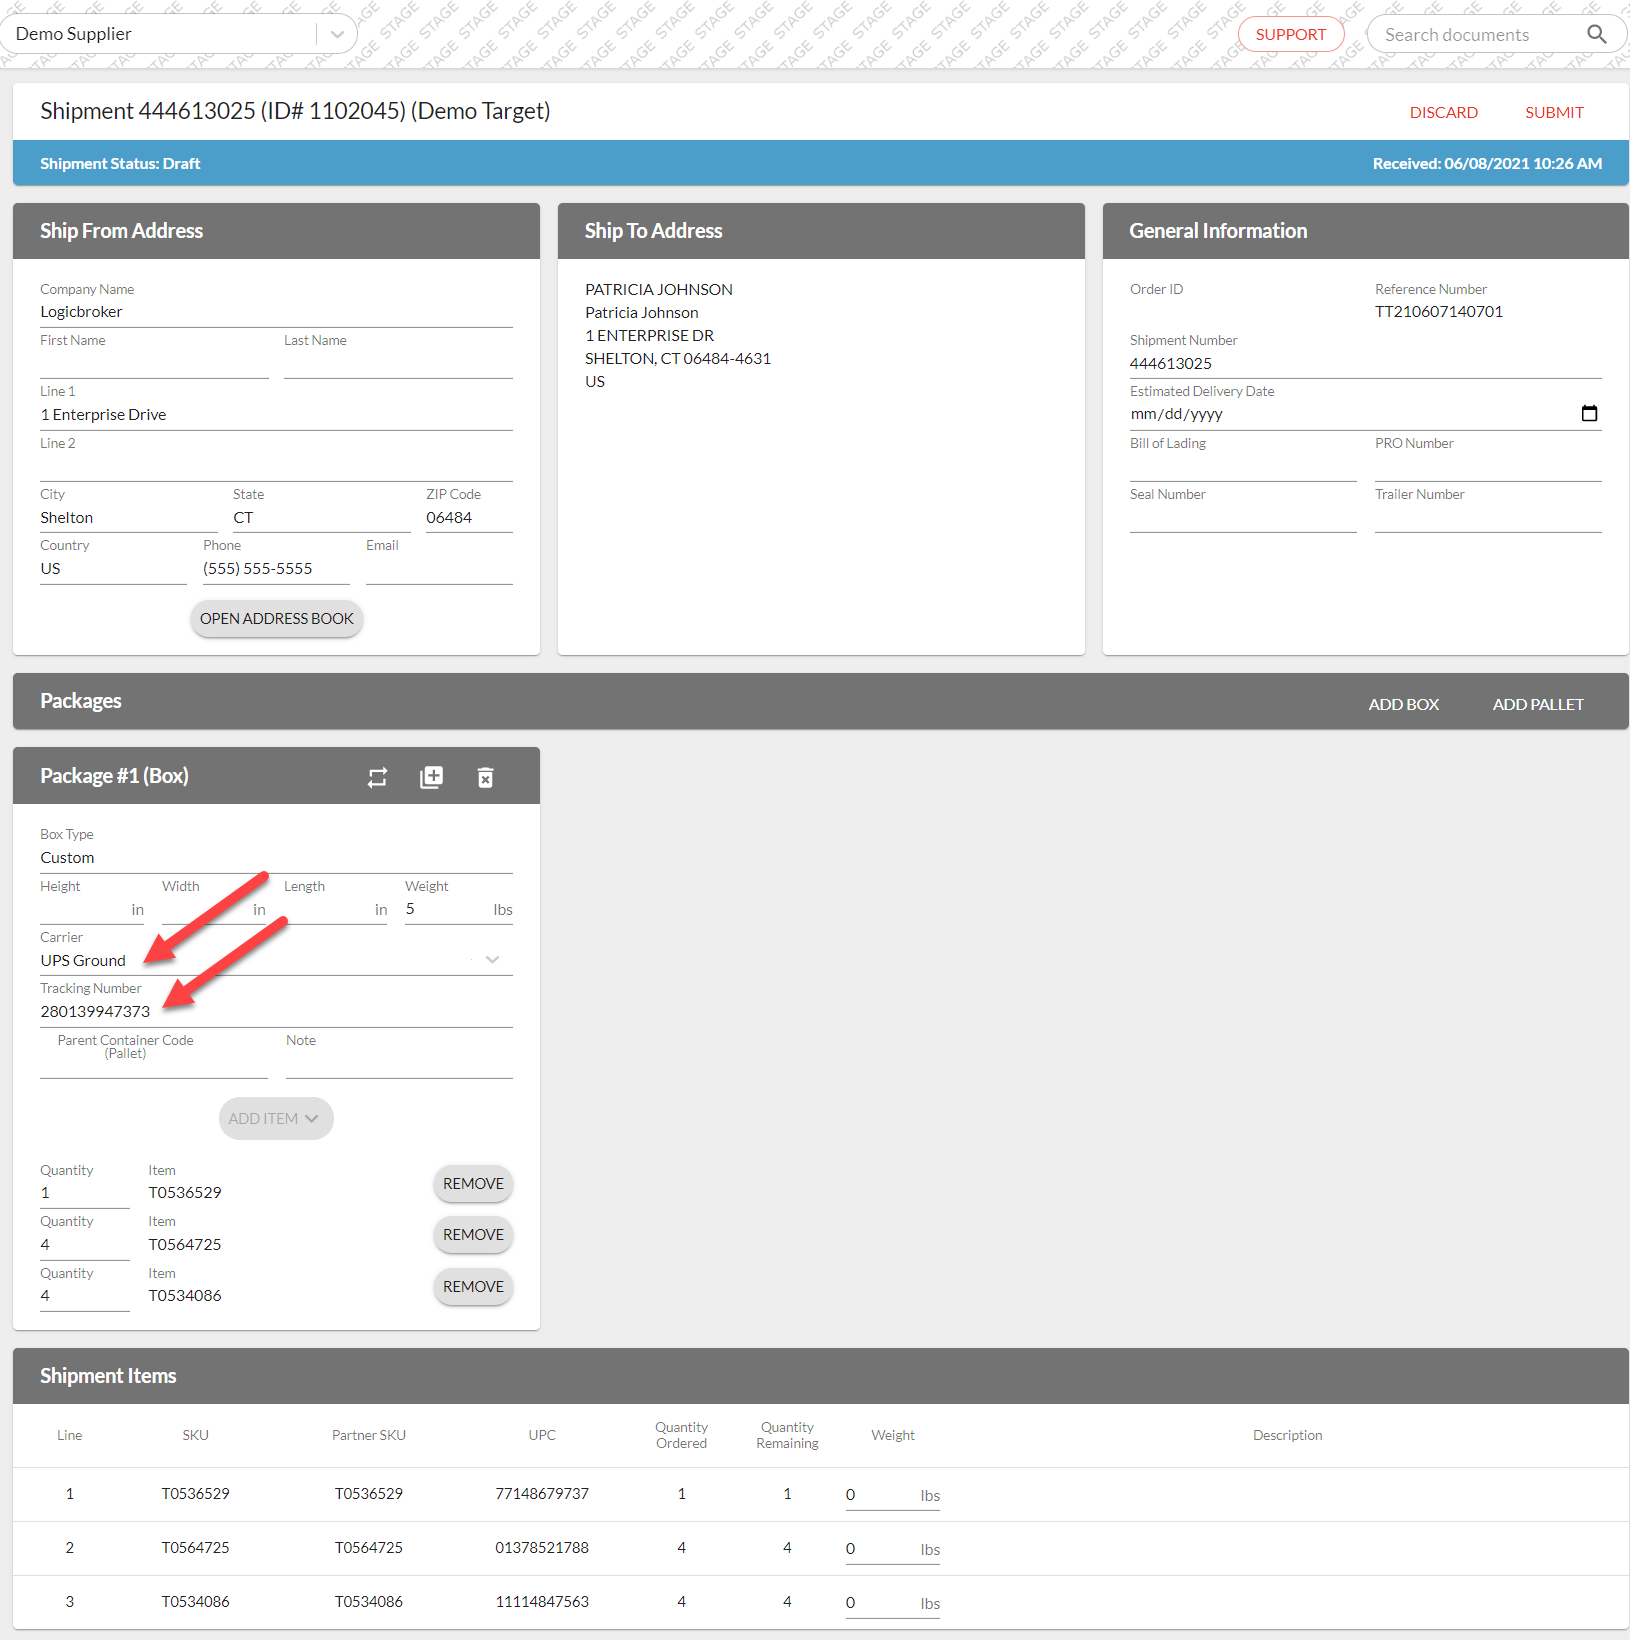 If you are shipping multiple boxes, you can click Add Box on the Packages bar. You will need to define all items and quantities being shipped in each package.
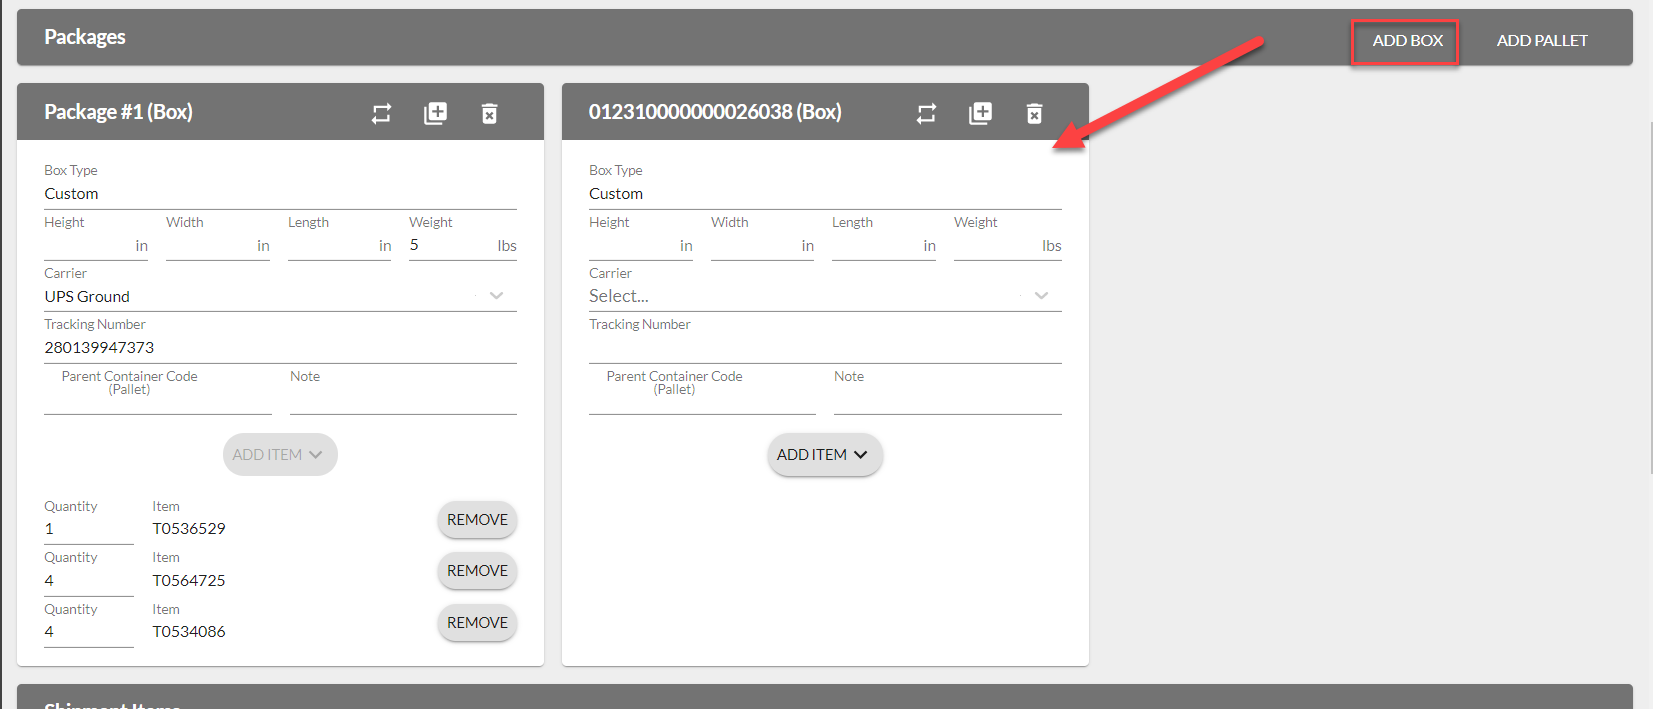
Once complete, click Submit at the top. After submission, the document will process and provide you the results for that step in the test case. For successful test cases the status will move to Complete and for errors it will move to Failed.
For more information on submitting shipments see this article.
Invoices
Creating invoices can be done in 2 ways. You can create an invoice off of the Order using the same shown previously - navigating to the test order and clicking Invoice or creating the Invoice off of the Shipment. If creating the invoice off of the shipment, only items that were shipped will appear on the invoice document.

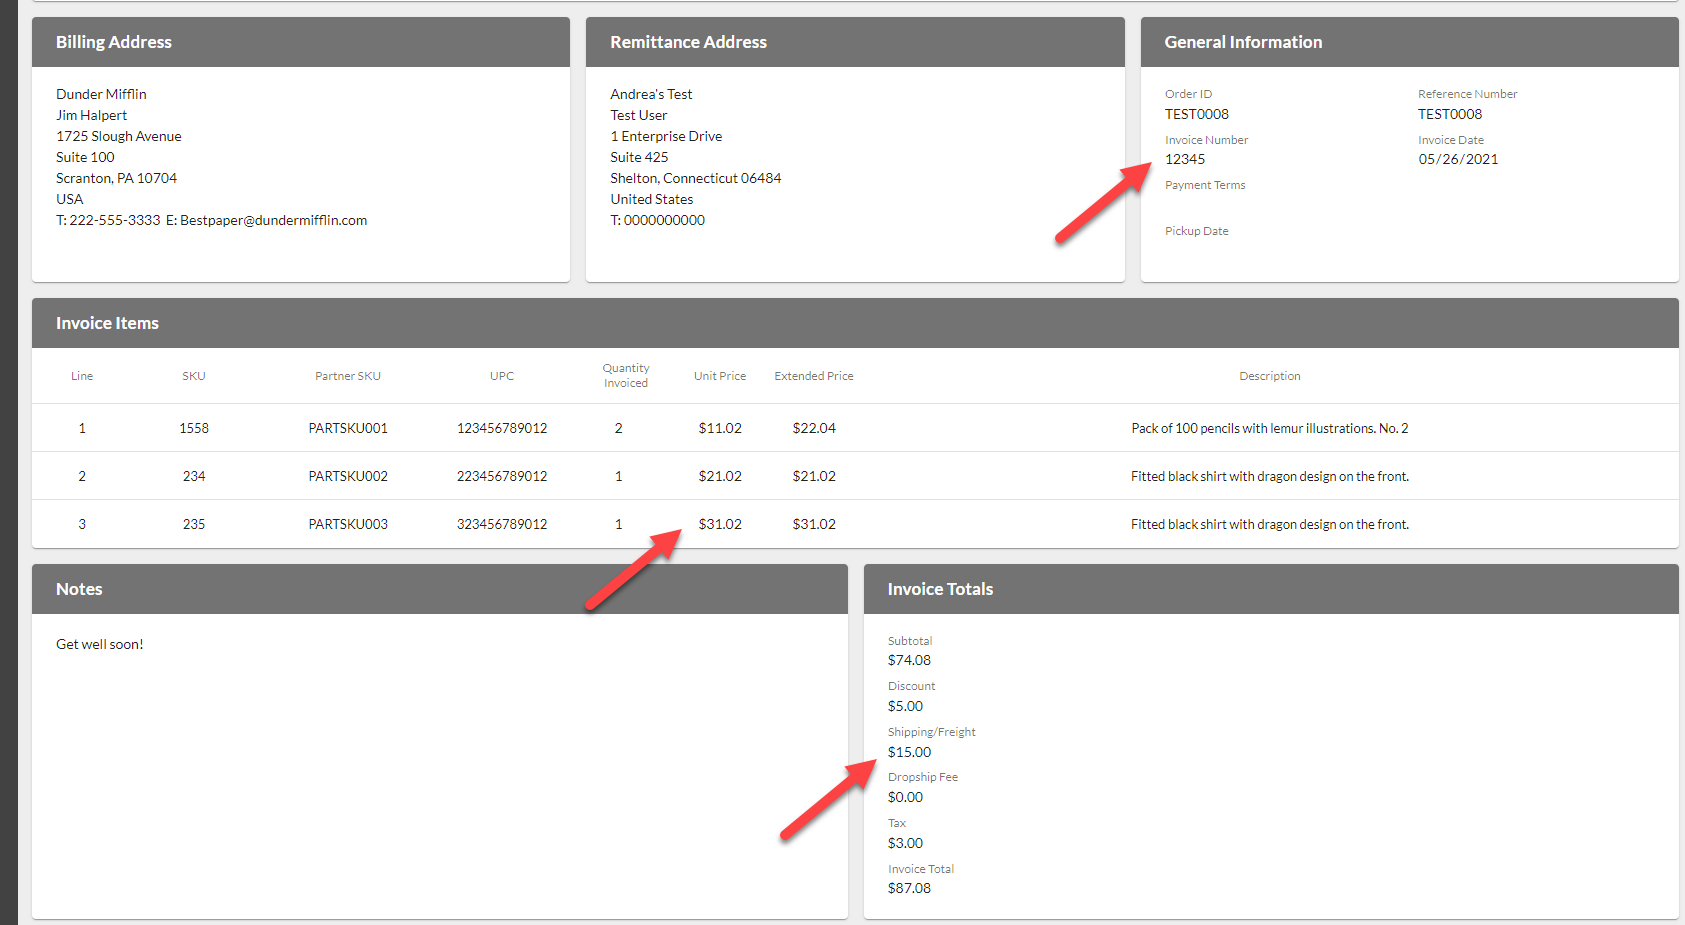 On the Invoice page you will need to add all necessary billing information. This will include invoice number, item quantity, pricing, discounts, handling, and taxes.
Once complete, click Submit at the top. After submission, the document will process and provide you the results for that step in the test case. For successful test cases the status will move to Complete and for errors it will move to Failed.
For more information on submitting shipments see this article.
Returns
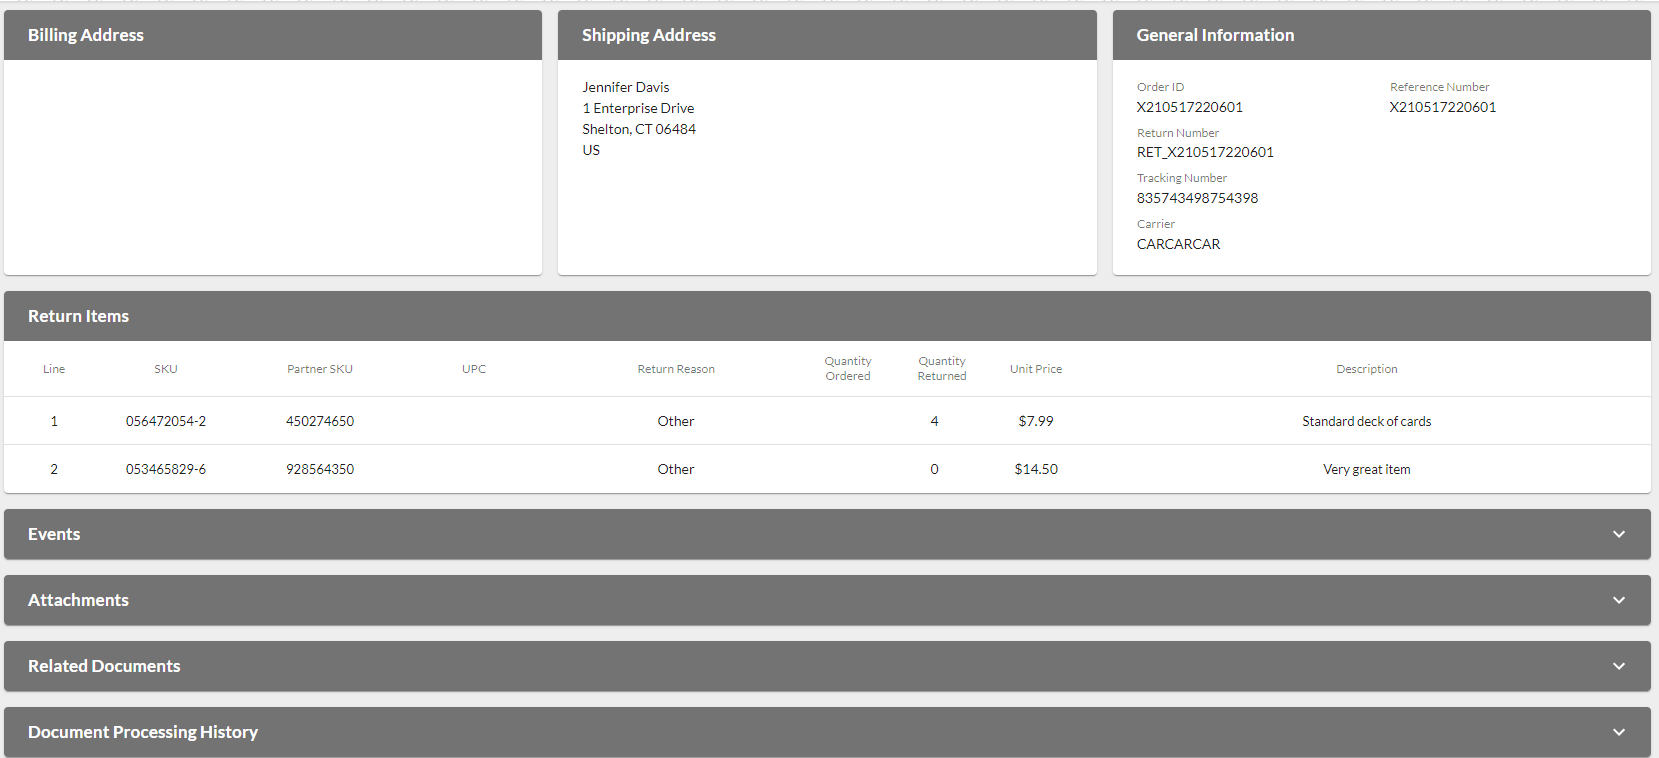
The process for creating a return is the same as above. Begin by navigating to your test order and at the top click More Actions > Return Items.

On the return page enter all the items and quantities that are being returned. Include any return reasons that were provided by the end customer as well. There will be required codes provided by your retailer/channel.
 Inventory
Inventory will not have a defined test case under this process. Refer back to Step 2: Setup Inventory/Products. Once you create your items and provide an inventory update successfully your testing process is complete.
For transmitting EDI documents, you will need to refer to our document specifications.
When receiving an order we will transmit it to your configured AS2 endpoint; this will be indicated by the status of your order changing from Submitted to Ready to Acknowledge or Ready to Ship. It is moved to Ready to Acknowledge if the partner requires acknowledgements or Ready to Ship if it does not. The order will move to Failed if communication cannot be reached, providing details as an event.
Sending documents to your partner will require all proper ISA and GS Ids as they will be used to identify which partner they belong. All documents sending to your partner will move to Complete on successful transmission, if not they will move to a Failed status. Failed will typically indicate a data validation error or connection error to your partner. All documents successfully transmitted you will receive a FuncAck (997).
If using Logicbroker's hosted SFTP/FTP you can follow the link here to learn how to connect. There will be a stage and production host for all your communications. To complete testing all documents will be transmitted through stage. All documents will get transmitted in the /EDI directory. /EDI/Inbound will contain all your Orders (850) and FuncAcks (997). When an order is successfully transmitted to your SFTP/FTP site, you will see the status update from Submitted to Ready to Acknowledge or Ready to Ship if no acknowledgement is required for that partner.
All documents sent to your partner - FuncAcks (997), Acknowledgements (855), Shipments (856), Invoice (810), Returns (180), and Inventory (846) will be sent to /EDI/Outbound. All documents sending to your partner will move to Complete on successful transmission, if not they will move to a Failed status. Failed will typically indicate a data validation error or connection error to your partner. All documents successfully transmitted you will receive a FuncAck (997). If you need to store your documents in an Archive, you can use the /EDI/Archive folder to store documents retrieved or sent.
Tip:
All login information to the Logicbroker hosted SFTP/FTP will create an event as an audit log for files uploaded and downloaded. You can see this information in the portal under Messages > Events
All EDI documents will transmit to your correct partner based on the EDI ISA and GS Ids. The values provided in your survey will be used.
If you would like to use a self-hosted SFTP or FTP site and wasn't provided in your survey, contact support.
Note:
If using VAN, please note there will be additional costs for this connection. It is always recommended to choose either AS2 or SFTP/FTP over VAN due to kilo-character charges.
To integrate using VAN you will need to provide your VAN provider and ISA Ids used to configure your VAN account. Logicbroker uses a 3rd party VAN provider (Easy Link/ICC.net) to transmit all documents. Your configured ISA and GS Ids will be used to route all documents to the appropriate mail boxes.
After creating your test orders, depending on your partner's requirements you will need to either return a test Acknowledgement, Shipment, Invoice or Return for the order. It is important to follow the test case closely as they will indicate which lines will be acknowledged (accepted, cancelled or backordered), which will be shipped, invoiced, and returned. For full information on using the portal to manage your orders see our Order Management section.
For transmitting JSON documents, you will need to refer to our document specifications.
Note:
Inventory is not available in the JSON format. Inventory will require using CSV/XLSX or XML.
If using Logicbroker's hosted SFTP/FTP you can follow the link here to learn how to connect. There will be a stage and production host for all your communications. To complete testing all documents will be transmitted through stage. All documents will get transmitted in the /JSON directory. /JSON/Inbound/Order will contain all your Orders. All documents available in this directory will remain in the Submitted status. Once the file is removed from the directory, the status of the order will change to Acknowledged. This will indicate the document was successfully retrieved.
Note:
If you need to receive packing slips automatically you can use the /PackingSlips/Inbound/Order directory. This will require additional setup, please contact support for more information.
Tip:
If you need to retrieve documents with a different directory location per partner you can use the /JSON/InboundByPartner directory. Each partner will have a folder for each of their account numbers. Documents will process the same as /JSON/Inbound.
All documents sent to your partner - Acknowledgements, Shipments, Invoice, and Returns will be sent to /JSON/Outbound/<DocumentType>. <DocumentType> will change according to the document you are transmitting, this includes Order, Acknowledgement, Shipment, Invoice and Return. All documents sending to your partner will move to Complete on successful transmission, if not they will move to a Failed status. Failed will typically indicate a data validation error or connection error to your partner. If you need to store your documents in an Archive, you can use the /JSON/Archive folder to store documents retrieved or sent.
Tip:
All login information to the Logicbroker hosted SFTP/FTP will create an event as an audit log for files uploaded and downloaded. You can see this information in the portal under Messages > Events
All JSON documents will transmit to your correct partner based on the PartnerPO you provided. It will automatically link to the order setting the correct sender and receiver.
If you would like to use a self-hosted SFTP or FTP site and wasn't provided in your survey, contact support.
To integrate using REST API, you can follow the Supplier order life cycle in our developer documentation. You can authorize your connections using an API Key used as a query parameter or OAuth using your portal login information. All orders retrieved through the API will belong in the Submitted (100) status and will be need to be moved to Acknowledged (200) when the document is successfully transmitted into your system.
To send Acknowledgements, Shipments, and Invoices you will use the POST method for each endpoint. Each request will have standard validation processed before the document is created. It will reflect the data requirements for each partner you are integrating with. Once a document is submitted, it will process from the Submitted (100) status to Complete (1000) when successfully transmitted, if not they will move to a Failed (1200) status. Failed will typically indicate a data validation error or connection error to your partner.
After creating your test orders, depending on your partner's requirements you will need to either return a test Acknowledgement, Shipment, Invoice or Return for the order. It is important to follow the test case closely as they will indicate which lines will be acknowledged (accepted, cancelled or backordered), which will be shipped, invoiced, and returned. For full information on using the portal to manage your orders see our Order Management section.
For transmitting XML documents, you will need to refer to our document specifications.
If using Logicbroker's hosted SFTP/FTP you can follow the link here to learn how to connect. There will be a stage and production host for all your communications. To complete testing, all documents will be transmitted through stage. All documents will get transmitted in the /APIXML directory. /APIXML/Inbound/Order will contain all your Orders. All documents available in this directory will remain in the Submitted status. Once the file is removed from the directory, the status of the order will change to Acknowledged. This will indicate the document was successfully retrieved.
Note:
If you need to receive packing slips automatically you can use the /PackingSlips/Inbound/Order directory. This will require additional setup, please contact support for more information.
Tip:
If you need to retrieve documents with a different directory location per partner you can use the /APIXML/InboundByPartner directory. Each partner will have a folder for each of their account numbers. Documents will process the same as /APIXML/Inbound.
All documents sent to your partner - Acknowledgements, Shipments, Invoice, and Returns will be sent to /APIXML/Outbound/<DocumentType>. <DocumentType> will change according to the document you are transmitting, this includes Order, Acknowledgement, Shipment, Invoice and Return. All documents sending to your partner will move to Complete on successful transmission, if not they will move to a Failed status. Failed will typically indicate a data validation error or connection error to your partner. If you need to store your documents in an Archive, you can use the /APIXML/Archive folder to store documents retrieved or sent.
Tip:
All login information to the Logicbroker hosted SFTP/FTP will create an event as an audit log for files uploaded and downloaded. You can see this information in the portal under Messages > Events
All XML documents will transmit to your correct partner based on the PartnerPO you provided. It will automatically link to the order setting the correct sender and receiver.
If you would like to use a self-hosted SFTP or FTP site and wasn't provided in your survey, contact support.
Note:
If you are integrating using a custom XML format, you can use the /CustomXML directory; all sub-directories will be the same as above. Additionally, you can configure using a FuncAck XML as a receipt for all documents sent.
If you need to process inventory using an XML format contact support to help you get configured.
To integrate using REST API, you can follow the Supplier order life cycle in our developer documentation. You can authorize your connections using an API Key used as a query parameter or OAuth using your portal login information. All orders retrieved through the API will belong in the Submitted (100) status and will be need to be moved to Acknowledged (200) when the document is successfully transmitted into your system.
To send Acknowledgements, Shipments, and Invoices you will use the POST method for each endpoint. Each request will have standard validation processed before the document is created. It will reflect the data requirements for each partner you are integrating with. Once a document is submitted, it will process from the Submitted (100) status to Complete (1000) when successfully transmitted, if not they will move to a Failed (1200) status. Failed will typically indicate a data validation error or connection error to your partner.
After creating your test orders, depending on your partner's requirements you will need to either return a test Acknowledgement, Shipment, Invoice or Return for the order. It is important to follow the test case closely as they will indicate which lines will be acknowledged (accepted, cancelled or backordered), which will be shipped, invoiced, and returned. For full information on using the portal to manage your orders see our Order Management section.
For transmitting CSV/XLSX documents, you will need to refer to our document specifications.
If using Logicbroker's hosted SFTP/FTP you can follow the link here to learn how to connect. There will be a stage and production host for all your communications. To complete testing, all documents will be transmitted through stage. All documents will get transmitted in the /CSV directory. /CSV/Inbound/Order will contain all your Orders. All documents available in this directory will remain in the Submitted status. Once the file is removed from the directory, the status of the order will change to Acknowledged. This will indicate the document was successfully retrieved.
Note:
If you need to receive packing slips automatically you can use the /PackingSlips/Inbound/Order directory. This will require additional setup, please contact support for more information.
Tip:
If you need to retrieve documents with a different directory location per partner you can use the /CSV/InboundByPartner directory. Each partner will have a folder for each of their account numbers. Documents will process the same as /CSV/Inbound.
All documents sent to your partner - Acknowledgements, Shipments, Invoice, and Returns will be sent to /CSV/Outbound/<DocumentType>. <DocumentType> will change according to the document you are transmitting, this includes Order, Acknowledgement, Shipment, Invoice and Return. For Shipment documents, if you are using the standard tracking, the /CSV/Outbound/Shipment directory should be used. If you're using the standard on the Document Standards page, use the /CSV/Outbound/ExtendedShipment directory. All documents sending to your partner will move to Complete on successful transmission, if not they will move to a Failed status. Failed will typically indicate a data validation error or connection error to your partner. If you need to store your documents in an Archive, you can use the /CSV/Archive folder to store documents retrieved or sent.
Tip:
All login information to the Logicbroker hosted SFTP/FTP will create an event as an audit log for files uploaded and downloaded. You can see this information in the portal under Messages > Events
All CSV documents will transmit to your correct partner based on the PartnerPO you provided. It will automatically link to the order setting the correct sender and receiver.
If you would like to use a self-hosted SFTP or FTP site and wasn't provided in your survey, contact support.
Note:
All inventory will need to be processed under /CSV/<PartnerAccount>/Outbound. <PartnerAccount> will be your partners Account Number. For more details for all directories see SFTP/FTP Connection information.
To integrate using REST API, you can follow the Supplier order life cycle in our developer documentation. You can authorize your connections using an API Key used as a query parameter or OAuth using your portal login information. All orders retrieved through the API will belong in the Submitted (100) status and will be need to be moved to Acknowledged (200) when the document is successfully transmitted into your system. To get your orders using CSV you will need to use the GET /api/v1/Orders/Export endpoint.
To send Acknowledgements, Shipments, and Invoices you will use the POST /Import endpoint for each document. Each request will have standard validation processed before the document is created. It will reflect the data requirements for each partner you are integrating with. Once a document is submitted, it will process from the Submitted (100) status to Complete (1000) when successfully transmitted, if not they will move to a Failed (1200) status. Failed will typically indicate a data validation error or connection error to your partner.
If needed all CSV/XLSX can be exported and imported using the portal. For orders, you can export using the Order Management page and selecting your orders and clicking Export.

You can then export all selected orders with items; this will provide the format for importing tracking information for shipments.
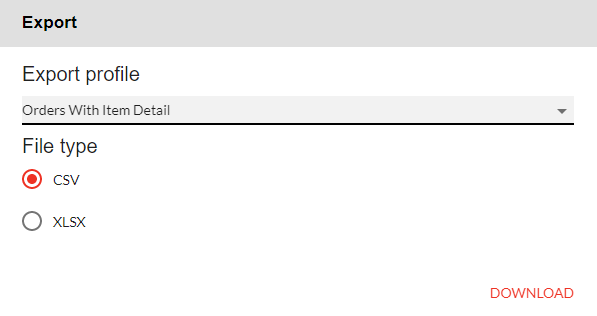
For more information on using the quick export on the order management page see the overview and the import tracking.
For creating custom exports you can use the Advanced Export feature. Here you can configure a custom format and filter for all documents in the Logicbroker system. Navigate to Files > Advanced Export You can select a default profile and edit it, changing column names to fit your format. For more information see this article.
For importing your acknowledgements, shipments, invoices, and returns go to Files > Advanced Import. By default all imports will use the standard format under Document Standards. The wizard on the page will walk you through the process. For more information on importing your documents, see this article.
Note:
If you are using a custom format our implementation team will need to configure your template. Contact support to help configure your custom format.
Comments
Please sign in to leave a comment.