Audience: Retailers use this to configure their taxonomy, showcase product requirements, and review and manage products sent from their suppliers. Suppliers use this functionality to upload products, map their attributes to the retailer's specifications, and collaborate with retail partners.
In this article, you will find information related to the Product Onboarding Center. The sections within this article are outlined below:
Overview
The Logicbroker Product Onboarding Center provides retailers and manufacturers with the ability to collect product data from their suppliers quickly and in their required format. The product onboarding center accelerates product onboarding times through more automation tools while providing suppliers with guardrails to help drive more compliant product file uploads and reduce the overall error rate. With this module, retailers and manufacturers can easily discover new products from their supplier network to quickly expand the assortment. Once the retail organization approves the data, workflows will help to provide full visibility into the synchronization process.
Data Flow
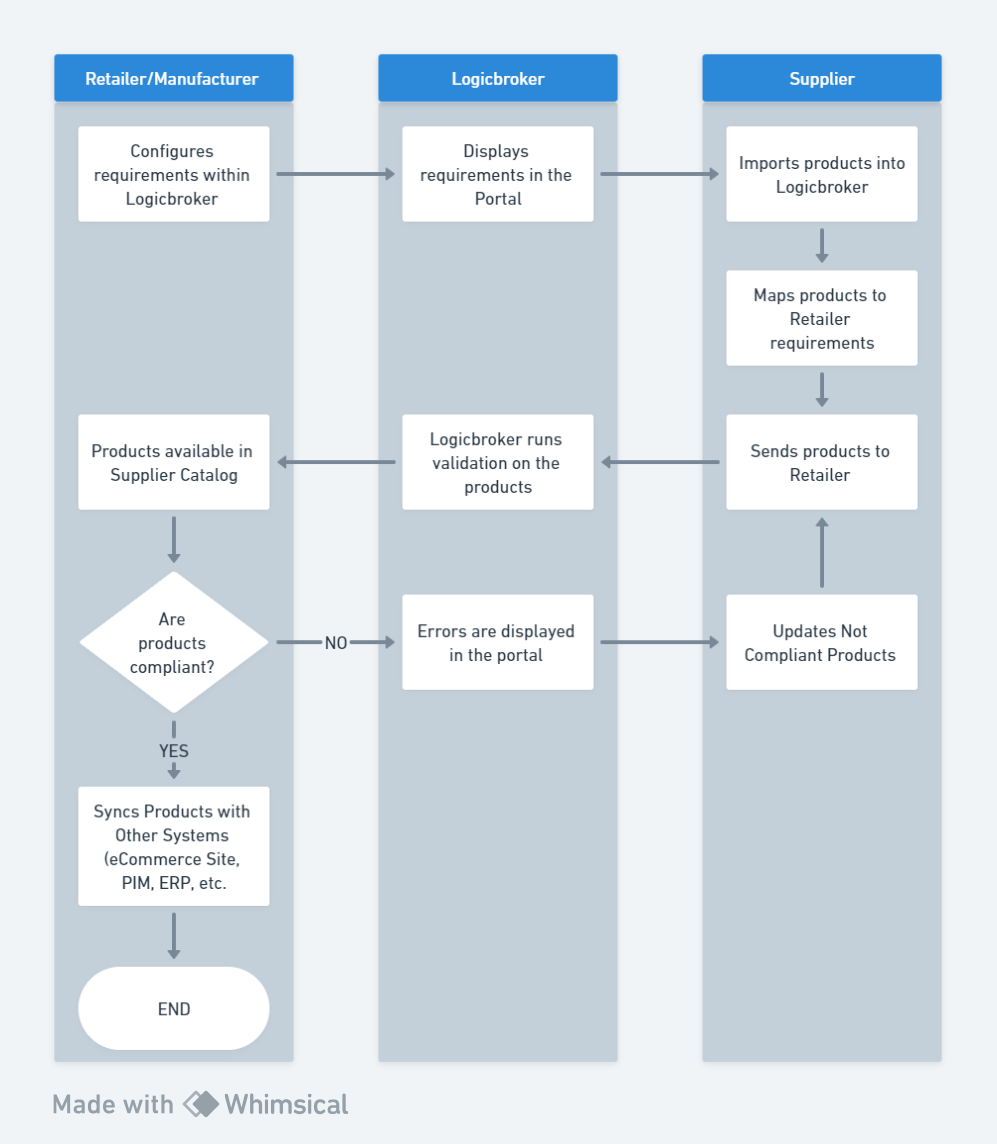
The standard product upload process is shown in the diagram below, however, there is opportunity to customize this depending on your business needs.

Navigating to the Product Onboarding Center
To access the Product Onboarding Center, navigate to the Products tab on the left-hand side toolbar and select Onboarding from the dropdown. This feature has various components, which are explained below.

User Permissions
Depending on a user's role within their organization and how they work with product data, there may need to be additional user permissions enabled.
| Permission |
Capabilities |
| Inventory/manage |
- edit products
- collaborate with suppliers on not compliant products
- approve or reject products
|
| Settings/manage |
- set up the organization's taxonomy - categories, attributes, attribute sets
- maintain the taxonomy
|
Product Onboarding Center Terminology
At a Glance
Supplier Catalogs – This is available to a retailer or manufacturer on the main catalog page. All of the products uploaded by a supplier and made visible to the retailer or manufacturer are displayed here providing the capabilities to easily bring new products into the assortment.
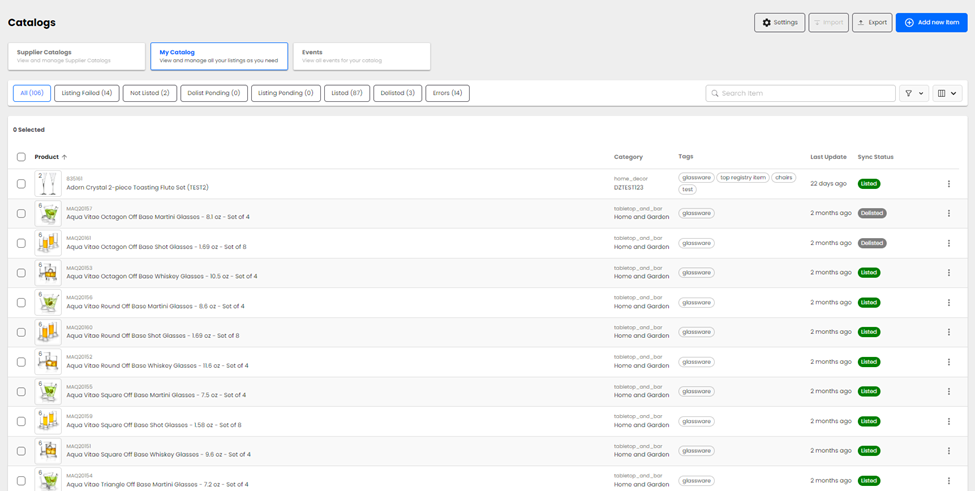
My Catalog – As a supplier, this is where all of your products are showcased within the portal. As a retailer, this will showcase all of the products you have brought into your assortment and will provide the appropriate status related to the synchronization process.
Retailer Catalogs – This is available to a supplier on the main catalog page. All of the products uploaded by the supplier and brought into the retailer's assortment are shown here. The catalogs are separated per partner.
Product – this is where the product name, SKU, and thumbnail are displayed for quick review within the respective catalog. There is also a number on the top left-hand corner of the image thumbnail indicating the number of images a product has.
Category – this is the category provided by the supplier to help with filtering/grouping
Tags – these are customizable filters that can be used within the respective catalogs. Tags can be used to segment products by merchant, season, top sellers, etc.
Last Update – this is the date and time (your time zone) that the product was last modified
Approval Status – status of the product within the approval flow. Clicking on a status will showcase all of the products with the same status.
Sync Status – status of the product within the synchronization flow. Clicking on a status will showcase all of the products with the same status.
Events
Date - this is the date and time (your time zone) that the event was created.
Severity - this indicates if the event is informational (info) or if there is an error and action needs to be taken (alert)
Summary – this will provide users with a general idea of what the event is (Catalog Import Error, Catalog Uploaded, etc.)
Details - this provides an overview of that particular event. This may include the user who submitted the catalog, the file name, and the date the product(s) was created. The view button to the right of the details will create a pop-out box to show the full details.
Display
Filter results – click on the filter icon in the top right to filter your results. Click add filter to select the field you want to filter by, the operator, the value you want to display and then click apply. Once a filter is added, you will see a number next to the filter icon indicating how many filters have been applied. Filters can be stacked, so click add filter to add new filters or the trash can to remove and then click apply.
Show/hide columns – click on the 3 vertical lines in the top right to customize your view. Columns with checked boxes will be shown in the catalog.
Search – utilize the product search the way you would the omnisearch. Users can stack multiple terms and use the asterisk as a wildcard to pull specific information without combing through pages of SKUs.
Actions
View – by clicking on the 3 vertical buttons, suppliers can view their products brought into the retailer's assortment.
Edit – by clicking on the 3 vertical buttons, users can click edit and be brought to the product details page.
Delete – by clicking on the 3 vertical buttons, users can delete products from My Catalog or the Supplier Catalog. Deleting a product removes the product from the Logicbroker system. If a product is in a listed status, it will need to be delisted before deleting.
List – by clicking on the 3 vertical buttons, retailers can sync products with other systems. The list action initiates this process. Listed products will have a green listed button on the respective product.
Delist – by clicking on the 3 vertical buttons, retailers can also remove products from other systems. The delist action initiates this process. Delisted products will have a gray delisted button on the respective product.
Approve – by clicking on the 3 vertical buttons, retailers can approve products received from their suppliers. Approved products will have a green approved status button on the respective product.
Reject – by clicking on the 3 vertical buttons, retailers can reject products received from their suppliers. Rejected products will have a red not compliant status button on the respective product.
Comments
Please sign in to leave a comment.